 FipCore
Tutorial
Overview
This section describes examples of how to use the FipCore library. All examples are based on the FipLabs design model 2sta_worldfip_xxx.labpro. The XML station configuration files associated are sta0_worldfip_xxx.xml [Station 0 - Tank A] and sta1_worldfip_xxx.xml [Station 1 - Tank B].
These files are located by default at the following paths:
On Windows
- 2sta_worldfip_xxx.labpro:
C:\Program Files (x86)\Exoligent\WorldFipTools\6.x\examples\FipLabs\2sta_worldfip\ - sta0_worldfip_xxx.xml and sta1_worldfip_xxx.xml:
C:\Program Files (x86)\Exoligent\WorldFipTools\6.x\examples\FipCore\2sta_worldfip\xml\
On Linux
- 2sta_worldfip_xxx.labpro:
/usr/local/Exoligent/WorldFipTools/6.x/examples/FipLabs/2sta_worldfip/ - sta0_worldfip_xxx.xml and sta1_worldfip_xxx.xml:
/usr/local/Exoligent/WorldFipTools/6.x/examples/FipCore/2sta_worldfip/xml/
The FIP context for these files is as follows:
[Station 0 - Tank A] - Configuration :
- Arbiter : true - 1 Scan Table
- Scan Table 1
- SEND_ID_DAT (0x8426)
- SEND_ID_DAT (0x8427)
- SEND_ID_DAT (0x0001)
- SEND_ID_DAT (0x9003)
- SEND_MSG (5 ms)
- SEND_APER (10 ms)
- WAIT_TIME (15 ms)
- NEXT_MACRO ()
- Scan Table 1
- Periodic IDs :
- ID(0x0001)
- Type: Out
- Length: 120 bytes
- Refreshment: true (200ms)
- Aperiodic's List Transfert Request: true
- Message Emission Channel: false
- Message Reception Channel: true
- ID(0x8426)
- Type: Out
- Length: 12 bytes
- Refreshment: true (50ms)
- Aperiodic's List Transfert Request: false
- Message Emission Channel: true (Type: Aperiodic - Channel: 0)
- Message Reception Channel: false
- ID(0x8427)
- Type: In
- Promptness: true (50ms)
- Message Reception Channel: false
- Other details: see Station1 - ID(0x8427)
- ID(0x0001)
- Aperiodic IDs
- ID(0x8322)
- Type: Out
- Length: 10 bytes
- Refreshment: false
- Aperiodic's List Transfert Request: false
- Message Emission Channel: false
- Message Reception Channel: false
- ID(0x8322)
- Message(s)
- ID (0x8426) to ID (0x8427)
- Source Address: Segment 0 - ID 0x8426
- Destination Address: Segment 0 - ID 0x8427
- Acknowledgment: true
- Channel Emission Attached: Type: Aperiodic - Channel: 0 (see ID(0x8426))
- ID (0x8426) to ID (0x8427)
- Tag(s)
Only produced tags are described here, but this station consumes also the TB.xxxx tags from Station 1 [via ID(0x8427)].- TA.Notification
- Tag ID: 0
- Type: Ascii
- Access Rights: R/W
- Description: Text Notification
- FIP ID: 0x8322
- Bit Range: [0 ; 79]
- Endianness: Little-Endian
- TA.PumpPressure
- Tag ID: 19
- Type: UInt16
- Access Rights: R/W
- Description: psi
- FIP ID: 0x8426
- Bit Range: [80 ; 95]
- Endianness: Little-Endian
- TA.PumpAmps
- Tag ID: 20
- Type: Float
- Access Rights: R/W
- Description: A
- FIP ID: 0x8426
- Bit Range: [48 ; 79]
- Endianness: Big-Endian
- TA.PumpAlarm
- Tag ID: 21
- Type: Bool
- Access Rights: R/W
- Description: on / off
- FIP ID: 0x8426
- Bit Range: [42 ; 42]
- TA.PumpTemperature
- Tag ID: 22
- Type: Float
- Access Rights: R/W
- Description: Celsius
- FIP ID: 0x8426
- Bit Range: [8 ; 39]
- Endianness: Little-Endian
- TA.Volume
- Tag ID: 23
- Type: UInt8
- Access Rights: R/W
- Description: %
- FIP ID: 0x8426
- Bit Range: [0 ; 7]
- TA.Notification
[Station 1 - Tank B] - Configuration :
- Arbiter : true - 1 Scan Table
- Scan Table 1
- SEND_ID_DAT (0x8426)
- SEND_ID_DAT (0x8427)
- SEND_ID_DAT (0x0001)
- SEND_ID_DAT (0x9003)
- SEND_MSG (5 ms)
- WAIT_TIME (5 ms)
- NEXT_MACRO ()
- Scan Table 1
- Periodic IDs
- ID(0x8426)
- Type: In
- Promptness: true (50ms)
- Message Reception Channel: false
- Other details: see Station0 - ID(0x8426)
- ID(0x8427)
- Type: Out
- Length: 12 bytes
- Refreshment: true (200ms)
- Aperiodic's List Transfert Request: false
- Message Emission Channel: false
- Message Reception Channel: true
- ID(0x8426)
- Aperiodic IDs
- ID(0x8322)
- Type: In
- Promptness: true (50ms)
- Message Reception Channel: false
- Other details: see Station0 - ID(0x8322)
- ID(0x8322)
- Tag(s)
Only produced tags are described here, but this station consumes also the TA.xxxx tags from Station 0 [via ID(0x8426)].- TB.PumpPressure
- Tag ID: 1
- Type: UInt16
- Access Rights: R/W
- Description: psi
- FIP ID: 0x8427
- Bit Range: [80 ; 95]
- Endianness: Little-Endian
- TB.PumpAmps
- Tag ID: 2
- Type: Float
- Access Rights: R/W
- Description: A
- FIP ID: 0x8427
- Bit Range: [48 ; 79]
- Endianness: Big-Endian
- TB.PumpAlarm
- Tag ID: 3
- Type: Bool
- Access Rights: R/W
- Description: on / off
- FIP ID: 0x8427
- Bit Range: [42 ; 42]
- TB.PumpTemperature
- Tag ID: 4
- Type: Float
- Access Rights: R/W
- Description: Celsius
- FIP ID: 0x8427
- Bit Range: [8 ; 39]
- Endianness: Little-Endian
- TB.Volume
- Tag ID: 5
- Type: UInt8
- Access Rights: R/W
- Description: %
- FIP ID: 0x8427
- Bit Range: [0 ; 7]
- TB.PumpPressure
Files example for a WorldFIP network at 1Mbps:
2sta_worldfip_1M.labpro, sta0_worldfip_1M.xml, sta1_worldfip_1M.xml
List FIP Arbiter Devices
The sample code below allows you to retrieve the devices available on your machine. The detected devices are contained in a FIP_DEVICECONF structures.
#include <stdio.h>
#include <stdlib.h>
#include <string.h>

#include "fipcore.h"

void print_device_info(FIP_DEVICECONF* device_conf);

int main(int argCount, char *argValue[])
{
    uint32_t ret = SUCCESS;
    uint8_t i = 0;
    FIP_DEVICECONF devices_list[20] = {0};
    uint8_t nb_detected_devices = 0;

    ret = fipcore_get_devices_number(&nb_detected_devices);
    if (ret != SUCCESS) {
        printf("fipcore_get_devices_number - %s\n", fipcore_get_error_str(ret));
        return ret;
    }

    printf("NUMBER OF DETECTED DEVICES - %d\n", nb_detected_devices);

    ret = fipcore_get_devices_list(devices_list, &nb_detected_devices);
    if (ret != SUCCESS) {
        printf("fipcore_get_devices_list - %s\n", fipcore_get_error_str(ret));
        return ret;
    }

    for (i = 0; i < nb_detected_devices; i++)
        print_device_info(&(devices_list[i]));

    return ret;
}
The print_device_info function displays the FIP_DEVICECONF structure:
void print_device_info(FIP_DEVICECONF* device_conf)
{
    switch(device_conf->device_type) {
    case PCI_PCIE_TYPE:     printf("   device_type     : PCI_PCIE_TYPE \n"); break;
    case USB_TYPE:          printf("   device_type     : USB_TYPE \n"); break;
    default:                printf("   device_type     : UNKNOWN_TYPE \n"); break;
    }
    printf("   device_index    : 0x%04x \n", device_conf->device_index);
    printf("   product_number  : 0x%08x \n", device_conf->product_number);
    printf("   device_version  : %d.%d.%d \n", device_conf->device_version.major,
                                            device_conf->device_version.minor,
                                            device_conf->device_version.revision);
    switch(device_conf->fip_speed) {
    case SPEED_31K25:   printf("   fip_speed       : SPEED_31K25 \n"); break;
    case SPEED_1M:      printf("   fip_speed       : SPEED_1M \n"); break;
    case SPEED_2M5:     printf("   fip_speed       : SPEED_2M5 or SPEED_5M \n"); break;
    default:            printf("   fip_speed       : UNKNOWN_SPEED \n"); break;
    }
    switch(device_conf->fip_impedance) {
    case IMPEDANCE_150: printf("   fip_impedance   : IMPEDANCE_150 \n\n"); break;
    case IMPEDANCE_120: printf("   fip_impedance   : IMPEDANCE_120 \n\n"); break;
    default:            printf("   fip_impedance   : UNKNOWN_IMPEDANCE \n\n"); break;
    }
}
To test this program, open a terminal and enter the following commands:
Raw Frame Exchanges
Here we present the code for the FIP Node with the address 0.
This example is sequenced as follows :
- Open Device / Load Configuration / Run Bus Arbiter
- Loop
- Each 1s
- write FIP var: ID (0x8426) value is incremented (4 first bytes / 12 total)
- read FIP var: ID (0x8427) value is read
- write FIP var: ID (0x8322) value is incremented (4 first bytes / 12 total)
- Events are popped (message and aperiodic var reception are treat here)
- Each 10s
- write FIP msg: ID (0x8426) to ID (0x8427) message is sent (data: "Hello World")
- Aperiodic Request (ID (0x8322)) is sent
- Device Medium is read
- Each 1s
- Stop Bus Arbiter / Unload Configuration / Close Device
C language - Station 0 [Tank A] - Raw Frame
// Station0 - Tank A
void station0_process(uint8_t device_type, uint8_t device_index, char* xml_path)
{
    uint32_t ret = SUCCESS;
    FIP_USERCONF      user_conf = {0};
    USERDEF_VARIABLE  var_conf = {0};
    PRODUCED_VARIABLE p_var = {0};
    CONSUMED_VARIABLE c_var = {0};
    MESSAGE_FRAME_OUT p_msg = {0};
    uint8_t i, j = 0;
    uint16_t src_id;
    uint16_t dst_id;
    uint16_t msg_length;
    char msg_data[] = "Hello World\n";
    uint32_t inc_data = 0;
    uint8_t loop_counter = 1;
    fipcore_device_handle* sta0_hnd = NULL;

    printf("/*****************************************************************************/\n");
    printf("/*                          STATION 0 TEST                                   */\n");
    printf("/*****************************************************************************/\n");

    sta0_hnd = fipcore_device_open(device_type, device_index, &ret);
    if (ret != SUCCESS) {
        printf("STATION 0 - %s\n", fipcore_get_error_str(ret));
        goto _exit1;
    }

    ret = fipcore_init_network(sta0_hnd, XML, xml_path, NULL);
    if (ret != SUCCESS)
        goto _exit;

    // Optional Configuration Information -
    // (To execute after fipcore_init_network function)
    //fipcore_get_config(sta0_hnd, &user_conf);
    //print_conf(&user_conf);
    //fipcore_get_var_config_by_id(sta0_hnd, 0x8426, &var_conf);
    //print_var_conf(&var_conf);

    ret = fipcore_start_network(sta0_hnd);
    if (ret != SUCCESS)
        goto _exit;

    ret = fipcore_start_ba(sta0_hnd, 1);
    if (ret != SUCCESS)
        goto _exit;

    // Output variables init
    fipcore_write_var_by_id(sta0_hnd, 0x0001, &p_var);
    fipcore_write_var_by_id(sta0_hnd, 0x8426, &p_var);
    fipcore_write_var_by_id(sta0_hnd, 0x8322, &p_var);

    // Output message init
    src_id = 0x8426;
    dst_id = 0x8427;

    msg_length = MSG_HEADER_SIZE + sizeof(msg_data);
    p_msg.Msg_Mode_PF = (uint8_t) (MSG_MODE_NO_ACK >> 8);
    p_msg.Msg_Mode_Pf = (uint8_t) MSG_MODE_NO_ACK;
    p_msg.Msg_Length_PF = (uint8_t) (msg_length >> 8);
    p_msg.Msg_Length_Pf = (uint8_t) msg_length;
    //      Message header
    p_msg.Dest_Add_PF = (uint8_t) (dst_id >> 8);
    p_msg.Dest_Add_Pf = (uint8_t) dst_id;
    p_msg.Dest_Segment = 0;
    p_msg.Src_Add_PF = (uint8_t) (src_id >> 8);
    p_msg.Src_Add_Pf = (uint8_t) src_id;
    p_msg.Src_Segment = 0;
    for (i = 0; i < sizeof(msg_data); i++)
        p_msg.Useful_Data[i] = (uint8_t) msg_data[i];

    while (1) {

        printf("SECTION LOOP - EACH 1 SECOND\n");

        bool is_prompt = false;
        bool is_refreshed = false;

        // ID (0x8426) value is incremented (4 first bytes / 12 total)
        printf("  fipcore_write_var_by_id - ID(0x8426) - DATA: ");
        memset(&p_var, 0, sizeof(PRODUCED_VARIABLE));
        *((uint32_t*) (p_var.Data_Var)) = inc_data;
        for (i = 0; i < 12; i++)
            printf(" 0x%02x", p_var.Data_Var[i]);
        printf("\n");

        ret = fipcore_write_var_by_id(sta0_hnd, 0x8426, &p_var);
        if (ret != SUCCESS)
            goto _exit;

        printf("  fipcore_read_var_by_id  - ID(0x8427) - ");
        memset(&c_var, 0, sizeof(CONSUMED_VARIABLE));
        ret = fipcore_read_var_by_id(sta0_hnd, 0x8427, &c_var, &is_prompt, &is_refreshed);
        if (ret == SUCCESS) {
            printf("DATA: ");
            for (i = 0; i < c_var.Length; i++)
                printf(" 0x%02x", c_var.Data_Var[i]);
            printf("\n");
            printf("      [MORE INFO: IsPrompt: %d - IsRefreshed: %d - PDU: 0x%02x - Length: 0x%02x - ProductionStatus: 0x%02x]\n",
                  is_prompt, is_refreshed, c_var.Pdu, c_var.Length, c_var.Production_Status);
        } else
            printf("ERROR - %s\n", fipcore_get_error_str(ret));

        // ID (0x8322) value is incremented (4 first bytes / 12 total)
        // Note: ID (0x8322) is written each 1s. However, production on the network will be effective
        // only each 10s (see fipcore_send_aper_by_id routine below).
        // This is due to the fact that ID (0x8322) is not present in the scan tables of the arbiter.
        // So it's an apriodic variable.
        printf("  fipcore_write_var_by_id - ID(0x8322) - DATA: ");
        memset(&p_var, 0, sizeof(PRODUCED_VARIABLE));
        *((uint32_t*) (p_var.Data_Var)) = inc_data;
        for (i = 0; i < 12; i++)
            printf(" 0x%02x", p_var.Data_Var[i]);
        printf("\n");

        ret = fipcore_write_var_by_id(sta0_hnd, 0x8322, &p_var);
        if (ret != SUCCESS)
            goto _exit;

        inc_data++;

        event_processing(sta0_hnd);

        if (loop_counter == 10) { // Each 10s

            printf("SECTION LOOP - EACH 10 SECONDS\n");

            // ID (0x8426) to ID (0x8427) message is sent (data: "Hello World")
            // Send on channel 0 (aperiodic)
            printf("  fipcore_write_msg - From ID(0x8426) to ID(0x8427) - CH.0 - MSG: 'Hello World'\n");
            ret = fipcore_write_msg(sta0_hnd, 0, &p_msg);
            if (ret != SUCCESS)
                goto _exit;

            printf("  fipcore_send_aper_by_id - ID(0x8322) - URGENT\n");
            // Aperiodic Request (ID (0x8322)) is sent
            ret = fipcore_send_aper_by_id(sta0_hnd, 0x8322, 1); // 1: Urgent Mode
            if (ret != SUCCESS)
                goto _exit;

            // Device Medium is read
            medium_processing(sta0_hnd);
        }

        if (kbhit())
            break;

#if defined(_WIN32) || defined(_WIN64)
        Sleep(1000);
#else
        usleep(1000000);
#endif
        if (loop_counter >= 10)
            loop_counter = 0;

        loop_counter++;
        printf("\n");
    }

    ret = fipcore_stop_ba(sta0_hnd);

_exit:
    if (ret != SUCCESS)
        printf("STATION 0 - %s\n", fipcore_get_error_str(ret));

    ret = fipcore_stop_network(sta0_hnd);
    if (ret != SUCCESS)
        printf("STATION 0 - %s\n", fipcore_get_error_str(ret));
_exit1:
    ret = fipcore_device_close(sta0_hnd);
    if (ret != SUCCESS)
        printf("STATION 0 - %s\n", fipcore_get_error_str(ret));
}
See the main file here: main.c
The complete source code is contained in the directory:
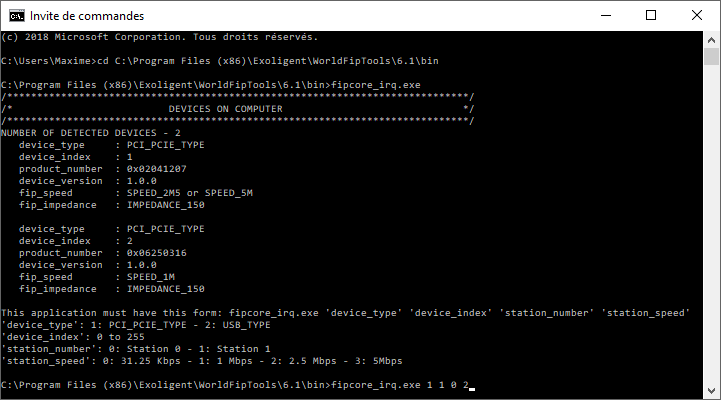
To test this program, open a terminal and enter the following commands:
Note: In the example, we attach a PCI/PCIe (1) FipArbiter device (Index 1) with the FIP Station (Addr 0) XML configuration file for a 2.5Mbps (2) FIP network.
Windows console - Raw Frame example
Mnemonic Exchanges
This example is based on the above example (Raw Frame Exchanges). However, instead of manipulating the raw FIP frames as before, the aim here is to read/write targeted and formatted data from/to the FIP network using the mnemonics (called also tags).
Here we present the code for the FIP Node with the address 0.
Tank A station produces the tags: TAVolume, TAPumpTemperature, TAPumpAlarm, TAPumpAmps, TAPumpPressure and TANotification.
Tank A station consumes the tags: TBVolume, TBPumpTemperature, TBPumpAlarm, TBPumpAmps, TBPumpPressure.
C language - Station 0 [Tank A] - Mnemo
// Station0 - Tank A
void station0_process(uint8_t device_type, uint8_t device_index, char* xml_path)
{
    uint32_t ret = SUCCESS;
    USERDEF_TAG tag_conf = {0};
    USERDEF_MESSAGE msg_conf = {0};
    FIP_USERCONF user_conf = {0};
    PRODUCED_VARIABLE p_var = {0};
    uint16_t loop_counter_1s = 200;     // 5ms multiple
    uint16_t loop_counter_10s = 2000;   // 5ms multiple
    time_t   t;
    fipcore_device_handle* sta0_hnd = NULL;

    // OUT Tags
    uint8_t  TAVolume= 50;
    float    TAPumpTemperature = 0;
    bool     TAPumpAlarm  = false;
    float    TAPumpAmps = 0;
    uint16_t TAPumpPressure = 0;
    char     TANotification[10] = {0};
    uint16_t notificationNumber = 0;

    // IN Tags
    uint8_t  TBVolume= 0;
    float    TBPumpTemperature = 0;
    bool     TBPumpAlarm  = false;
    float    TBPumpAmps = 0;
    uint16_t TBPumpPressure = 0;

    /* Intializes random number generator */
    srand((unsigned) time(&t));

    printf("/*****************************************************************************/\n");
    printf("/*                          STATION 0 TEST                                   */\n");
    printf("/*****************************************************************************/\n");

    sta0_hnd = fipcore_device_open(device_type, device_index, &ret);
    if (ret != SUCCESS) {
        printf("STATION 0 - %s\n", fipcore_get_error_str(ret));
        goto _exit1;
    }

    ret = fipcore_init_network(sta0_hnd, XML, xml_path, NULL);
    if (ret != SUCCESS)
        goto _exit;

    // Optional Configuration Information -
    // (To execute after fipcore_init_network function)
    // ipcore_get_config(sta0_hnd, &user_conf);
    // print_conf(&user_conf);

    ret = fipcore_start_network(sta0_hnd);
    if (ret != SUCCESS)
        goto _exit;

    ret = fipcore_start_ba(sta0_hnd, 1);
    if (ret != SUCCESS)
        goto _exit;

    // TB.PumpTemperature
    // ret = fipcore_get_tag_config_by_name(sta0_hnd, "TB.PumpTemperature", &tag_conf);
    // if (ret != SUCCESS)
    //     goto _exit;
    // print_tag_conf(&tag_conf);

    // ret = fipcore_get_msg_config_by_header(sta0_hnd, 0x8427, 0, 0x8426, 0, &msg_conf);
    // if (ret != SUCCESS)
    //     goto _exit;
    // print_msg_conf(&msg_conf);

    // Output variables init
    fipcore_write_var_by_id(sta0_hnd, 0x0001, &p_var);
    fipcore_write_var_by_id(sta0_hnd, 0x8426, &p_var);
    fipcore_write_var_by_id(sta0_hnd, 0x8322, &p_var);

    while (1) {
        // MAIN LOOP - EACH 5 MILLISECONDS

        if (loop_counter_10s == 0) {    // Each 10s

            printf("SECTION LOOP - EACH 10 SECONDS\n");

            // Device Medium is read
            medium_processing(sta0_hnd);

            printf("\n");

            // OUT Tag - TA.Notification (Attached to 0x8322 aperiodic variable)
            notificationNumber++;
            sprintf(TANotification, "TANot%d", notificationNumber);
            ret = fipcore_write_tag_by_name(sta0_hnd, "TA.Notification", (void*) TANotification);
            if (ret != SUCCESS)
                printf("fipcore_write_tag_by_name - TA.Notification - %s\n", fipcore_get_error_str(ret));

            // Aperiodic Request (ID (0x8322)) is sent
            ret = fipcore_send_aper_by_id(sta0_hnd, 0x8322, 1); // 1: Urgent Mode
            if (ret != SUCCESS)
                goto _exit;

            printf("  OUT ID(0x8322) - TA.Notification: %s\n", TANotification);

            loop_counter_10s = 2000;
        }

        if (loop_counter_1s == 0) {     // Each 1s

            printf("SECTION LOOP - EACH 1 SECOND\n");

            // OUT Tags - ID (0x8426) - Tags related to Tank A
            TAPumpTemperature = randomTemperatureFloat();
            ret = fipcore_write_tag_by_name(sta0_hnd, "TA.PumpTemperature", (void*) &TAPumpTemperature);
            if (ret != SUCCESS)
                printf("fipcore_write_tag_by_name - TA.PumpTemperature - %s\n", fipcore_get_error_str(ret));
            else
                printf("  OUT ID(0x8426) - TA.PumpTemperature : %f Celsius\n", TAPumpTemperature);

            TAPumpAmps = randomAmpsFloat();
            ret = fipcore_write_tag_by_name(sta0_hnd, "TA.PumpAmps", (void*) &TAPumpAmps);
            if (ret != SUCCESS)
                printf("fipcore_write_tag_by_name - TA.PumpAmps - %s\n", fipcore_get_error_str(ret));
            else
                printf("  OUT ID(0x8426) - TA.PumpAmps        : %f A\n", TAPumpAmps);

            TAPumpPressure = randomPressureUInt16();
            ret = fipcore_write_tag_by_name(sta0_hnd, "TA.PumpPressure", (void*) &TAPumpPressure);
            if (ret != SUCCESS)
                printf("fipcore_write_tag_by_name - TA.PumpPressure - %s\n", fipcore_get_error_str(ret));
            else
                printf("  OUT ID(0x8426) - TA.PumpPressure    : %d psi\n", TAPumpPressure);

            TAPumpAlarm = false;
            if (TAPumpAmps > 60)
                TAPumpAlarm = true;
            ret = fipcore_write_tag_by_name(sta0_hnd, "TA.PumpAlarm", (void*) &TAPumpAlarm);
            if (ret != SUCCESS)
                printf("fipcore_write_tag_by_name - TA.PumpAlarm - %s\n", fipcore_get_error_str(ret));
            else
                printf("  OUT ID(0x8426) - TA.PumpAlarm       : %d\n", TAPumpAlarm);

            if (TAPumpAmps > 35) {
                TAVolume++;
                if (TAVolume > 100)
                    TAVolume = 100;
            } else {
                if (TAVolume != 0)
                    TAVolume--;
            }
            ret = fipcore_write_tag_by_name(sta0_hnd, "TA.Volume", (void*) &TAVolume);
            if (ret != SUCCESS)
                printf("fipcore_write_tag_by_name - TA.Volume - %s\n", fipcore_get_error_str(ret));
            else
                printf("  OUT ID(0x8426) - TA.Volume          : %d percent\n", TAVolume);

            // IN Tags - ID (0x8427) - Tags related to Tank B
            TBPumpTemperature = 0;
            ret = fipcore_read_tag_by_name(sta0_hnd, "TB.PumpTemperature", (void*) &TBPumpTemperature);
            if (ret != SUCCESS)
                printf("fipcore_read_tag_by_name - TB.PumpTemperature - %s\n", fipcore_get_error_str(ret));
            else
                printf("  IN  ID(0x8427) - TB.PumpTemperature : %f Celsius\n", TBPumpTemperature);

            TBPumpAmps = 0;
            ret = fipcore_read_tag_by_name(sta0_hnd, "TB.PumpAmps", (void*) &TBPumpAmps);
            if (ret != SUCCESS)
                printf("fipcore_read_tag_by_name - TB.PumpAmps - %s\n", fipcore_get_error_str(ret));
            else
                printf("  IN  ID(0x8427) - TB.PumpAmps        : %f A\n", TBPumpAmps);

            TBPumpPressure = 0;
            ret = fipcore_read_tag_by_name(sta0_hnd, "TB.PumpPressure", (void*) &TBPumpPressure);
            if (ret != SUCCESS)
                printf("fipcore_read_tag_by_name - TB.PumpPressure - %s\n", fipcore_get_error_str(ret));
            else
                printf("  IN  ID(0x8427) - TB.PumpPressure    : %d psi\n", TBPumpPressure);

            TBPumpAlarm = false;
            ret = fipcore_read_tag_by_name(sta0_hnd, "TB.PumpAlarm", (void*) &TBPumpAlarm);
            if (ret != SUCCESS)
                printf("fipcore_read_tag_by_name - TB.PumpAlarm - %s\n", fipcore_get_error_str(ret));
            else
                printf("  IN  ID(0x8427) - TB.PumpAlarm       : %d\n", TBPumpAlarm);

            TBVolume = 0;
            ret = fipcore_read_tag_by_name(sta0_hnd, "TB.Volume", (void*) &TBVolume);
            if (ret != SUCCESS)
                printf("fipcore_read_tag_by_name - TB.Volume - %s\n", fipcore_get_error_str(ret));
            else
                printf("  IN  ID(0x8427) - TB.Volume          : %d percent\n", TBVolume);

            loop_counter_1s = 200;

            printf("\n");
        }

        event_processing(sta0_hnd);

        if (kbhit())
            break;

#if defined(_WIN32) || defined(_WIN64)
        Sleep(5);
#else
        usleep(5000);
#endif
        loop_counter_10s--;
        loop_counter_1s--;
    }

    ret = fipcore_stop_ba(sta0_hnd);

_exit:
    if (ret != SUCCESS)
        printf("STATION 0 - %s\n", fipcore_get_error_str(ret));

    ret = fipcore_stop_network(sta0_hnd);
    if (ret != SUCCESS)
        printf("STATION 0 - %s\n", fipcore_get_error_str(ret));
_exit1:
    ret = fipcore_device_close(sta0_hnd);
    if (ret != SUCCESS)
        printf("STATION 0 - %s\n", fipcore_get_error_str(ret));
}
See the full file here: main.c
The complete source code is contained in the directory:
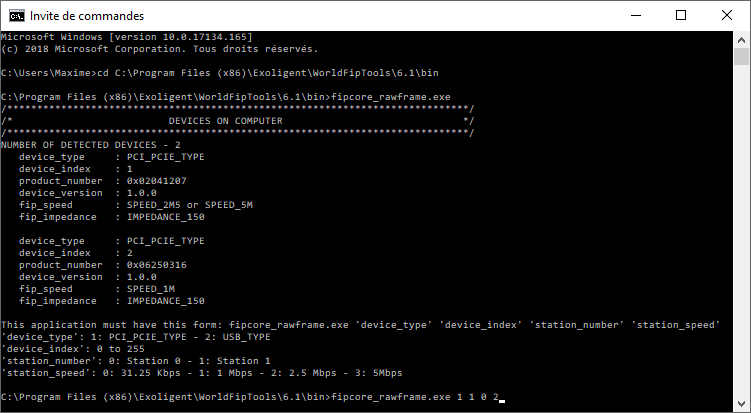
To test this program, open a terminal and enter the following commands:
Note: In the example, we attach a PCI/PCIe (1) FipArbiter device (Index 1) with the FIP Station (Addr 0) XML configuration file for a 2.5Mbps (2) FIP network.
Windows console - Mnemonic example
PT100 Sensor Example (Adam-5000)
This example is based on the above example (Mnemonic Exchanges). Here, we focuse on retrieve the value of a temperature sensor (PT100) and attach its value to a FIP mnemonic. We use an Advantech ADAM-5000 I/O Rack with the ADAM-5013 (3-ch RTD Input) module that communicates with a serial port (RS-232).
Here we present the code for the FIP Node with the address 0.
Tank A station produces the TAPumpTemperature tag.
Tank A station consumes the TBPumpTemperature tag
C language - Station 0 [Tank A] - Pt100
// Station0 - Tank A
void station0_process(uint8_t device_type, uint8_t device_index, char* xml_path)
{
    uint32_t ret = SUCCESS;
    USERDEF_TAG tag_conf = {0};
    FIP_USERCONF user_conf = {0};
    PRODUCED_VARIABLE p_var = {0};
    unsigned long tstart_1s, tstart_10s, tcurrent;
    fipcore_device_handle* sta0_hnd = NULL;

    // OUT Tags
    float    TAPumpTemperature = 0;
    // IN Tags
    float    TBPumpTemperature = 0;

    printf("/*****************************************************************************/\n");
    printf("/*                          STATION 0 TEST                                   */\n");
    printf("/*****************************************************************************/\n");

    sta0_hnd = fipcore_device_open(device_type, device_index, &ret);
    if (ret != SUCCESS) {
        printf("STATION 0 - %s\n", fipcore_get_error_str(ret));
        goto _exit1;
    }

    ret = fipcore_init_network(sta0_hnd, XML, xml_path, NULL);
    if (ret != SUCCESS)
        goto _exit;

    // Optional Configuration Information -
    // (To execute after fipcore_init_network function)
    //fipcore_get_config(sta0_hnd, &user_conf);
    //print_conf(&user_conf);

    ret = fipcore_start_network(sta0_hnd);
    if (ret != SUCCESS)
        goto _exit;

    ret = fipcore_start_ba(sta0_hnd, 1);
    if (ret != SUCCESS)
        goto _exit;

    // TB.PumpTemperature
    ret = fipcore_get_tag_config_by_name(sta0_hnd, "TB.PumpTemperature", &tag_conf);
    if (ret != SUCCESS)
        goto _exit;
    print_tag_conf(&tag_conf);

    // Output variables init
    fipcore_write_var_by_id(sta0_hnd, 0x0001, &p_var);
    fipcore_write_var_by_id(sta0_hnd, 0x8426, &p_var);
    fipcore_write_var_by_id(sta0_hnd, 0x8322, &p_var);

    tstart_1s  = GetTickCount();
    tstart_10s = GetTickCount();

    while (1) {
        // MAIN LOOP - EACH 5 MILLISECONDS

        // Get current tick
        tcurrent = GetTickCount();

        if ((tcurrent - tstart_10s) > 10000) {    // Each 10s

            printf("SECTION LOOP - EACH 10 SECONDS\n");

            // Device Medium is read
            medium_processing(sta0_hnd);
            printf("\n");

            tstart_10s = GetTickCount();
        }

        if ((tcurrent - tstart_1s) > 1000) {     // Each 1s

            printf("SECTION LOOP - EACH 1 SECOND\n");

            // OUT Tags - ID (0x8426) - Tags related to Tank A
            TAPumpTemperature = getTemperatureFloat();
            ret = fipcore_write_tag_by_name(sta0_hnd, "TA.PumpTemperature", (void*) &TAPumpTemperature);
            if (ret != SUCCESS)
                printf("fipcore_write_tag_by_name - TA.PumpTemperature - %s\n", fipcore_get_error_str(ret));
            else
                printf("  OUT ID(0x8426) - TA.PumpTemperature : %f Celsius\n", TAPumpTemperature);

            // IN Tags - ID (0x8427) - Tags related to Tank B
            TBPumpTemperature = 0;
            ret = fipcore_read_tag_by_name(sta0_hnd, "TB.PumpTemperature", (void*) &TBPumpTemperature);
            if (ret != SUCCESS)
                printf("fipcore_read_tag_by_name - TB.PumpTemperature - %s\n", fipcore_get_error_str(ret));
            else
                printf("  IN  ID(0x8427) - TB.PumpTemperature : %f Celsius\n", TBPumpTemperature);

            tstart_1s = GetTickCount();

            printf("\n");
        }

        event_processing(sta0_hnd);

        if (kbhit())
            break;

#if defined(_WIN32) || defined(_WIN64)
        Sleep(5);
#else
        usleep(5000);
#endif
    }

    ret = fipcore_stop_ba(sta0_hnd);

_exit:
    if (ret != SUCCESS)
        printf("STATION 0 - %s\n", fipcore_get_error_str(ret));

    ret = fipcore_stop_network(sta0_hnd);
    if (ret != SUCCESS)
        printf("STATION 0 - %s\n", fipcore_get_error_str(ret));
_exit1:
    ret = fipcore_device_close(sta0_hnd);
    if (ret != SUCCESS)
        printf("STATION 0 - %s\n", fipcore_get_error_str(ret));
}
See the full file here: main.c
The complete source code is contained in the directory:
To test this program, open a terminal and enter the following commands:
Note: In the example, we attach a PCI/PCIe (1) FipArbiter device (Index 1) with the FIP Station (Addr 0) XML configuration file for a 2.5Mbps (2) FIP network.
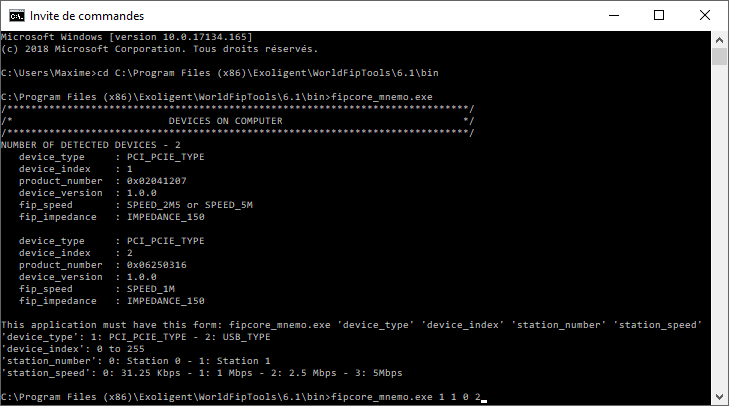
To display the pt100 sensor measurement, here we use a FipWatcher device with the FipLabs GUI (FipWatcher tab). The curve below shows a measurement result over ~24 hours :
FipLabs (FipWatcher) - Mnemonic TA.PumpTemperature (Pt100)
OPC UA - Non Blocking Mode
This example is based on the above example (Mnemonic Exchanges). The main difference is that we want here to expose the state and context of the FIP node to a remote system (SCADA, HMI ...).
To do this, the FipCore library has embedded functions to start an OPC Unified Architecture (OPC UA) server inside your program.
For more information about OPC UA, see link: OPC Foundation.
In our example, we need to continue to manipulate our FIP communication locally using FipCore library functions, so we will use a non-blocking architecture for our server.
This architecture requires 3 functions :
fipcore_opcua_run_startup, fipcore_opcua_run_iterate and fipcore_opcua_run_shutdown
These functions must be used when the FIP communication is in operation (ie after calling the fipcore_start_network function and before calling the fipcore_stop_network function).
// Station0 - Tank A
void station0_process(uint8_t device_type, uint8_t device_index, char* xml_path)
{
    uint32_t ret = SUCCESS;
    uint16_t opc_timeout = 0;
    fipcore_device_handle* sta0_hnd = NULL;

    sta0_hnd = fipcore_device_open(device_type, device_index, &ret);
    if (ret != SUCCESS) {
        printf("STATION 0 - %s\n", fipcore_get_error_str(ret));
        goto _exit1;
    }

    ret = fipcore_init_network(sta0_hnd, XML, xml_path, NULL);
    if (ret != SUCCESS)
        goto _exit;

    ret = fipcore_start_network(sta0_hnd);
    if (ret != SUCCESS)
        goto _exit;

    ret = fipcore_start_ba(sta0_hnd, 1);
    if (ret != SUCCESS)
        goto _exit;

    // Initialize your FIP output variables here
    // (...)

    /////////////////////////////////////////////////////////////////////////////////////
    // fipcore_opcua_run_startup
    // OPC UA START SERVER - NON BLOCKING MODE - TCP port: 16664
    /////////////////////////////////////////////////////////////////////////////////////
    ret = fipcore_opcua_run_startup(sta0_hnd, 16664, NULL);
    if (ret != SUCCESS)
        goto _exit;

    while (1) {
        // MAIN LOOP - EACH 5 MILLISECONDS

        // Do what you have to do here
        // (...)

#if defined(_WIN32) || defined(_WIN64)
        Sleep(5);
#else
        usleep(5000);
#endif

        /////////////////////////////////////////////////////////////////////////////////
        // fipcore_opcua_run_iterate
        // Task to repeat under the time specified by the variable opc_timeout
        // (in milliseconds)
        /////////////////////////////////////////////////////////////////////////////////
        ret = fipcore_opcua_run_iterate(sta0_hnd, false, &opc_timeout);
        if (ret != SUCCESS)
            goto _exit;
    }

    ret = fipcore_stop_ba(sta0_hnd);

    /////////////////////////////////////////////////////////////////////////////////////
    // fipcore_opcua_run_shutdown
    // OPC UA STOP SERVER
    /////////////////////////////////////////////////////////////////////////////////////
    ret = fipcore_opcua_run_shutdown(sta0_hnd);

_exit:
    if (ret != SUCCESS)
        printf("STATION 0 - %s\n", fipcore_get_error_str(ret));

    ret = fipcore_stop_network(sta0_hnd);
    if (ret != SUCCESS)
        printf("STATION 0 - %s\n", fipcore_get_error_str(ret));
_exit1:
    ret = fipcore_device_close(sta0_hnd);
    if (ret != SUCCESS)
        printf("STATION 0 - %s\n", fipcore_get_error_str(ret));
}
See the full file here: main.c
The complete source code is contained in the directory:
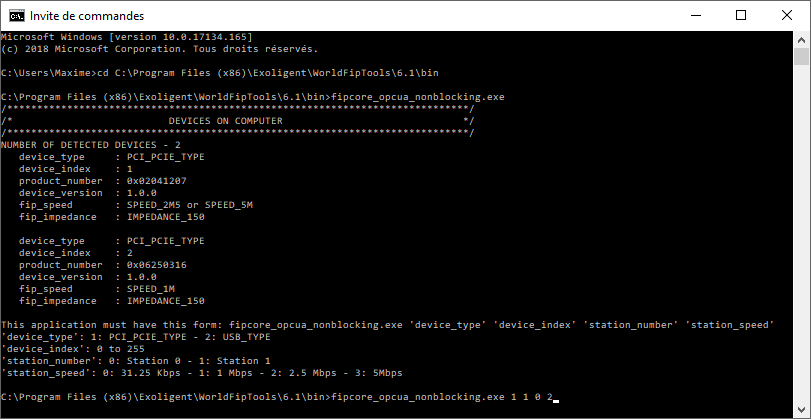
To test this example, open a terminal and enter the following commands:
Note: In the example, we attach a PCI/PCIe (1) FipArbiter device (Index 1) with the FIP Station (Addr 0) XML configuration file for a 2.5Mbps FIP network.
Windows console - OPC UA non-blocking example
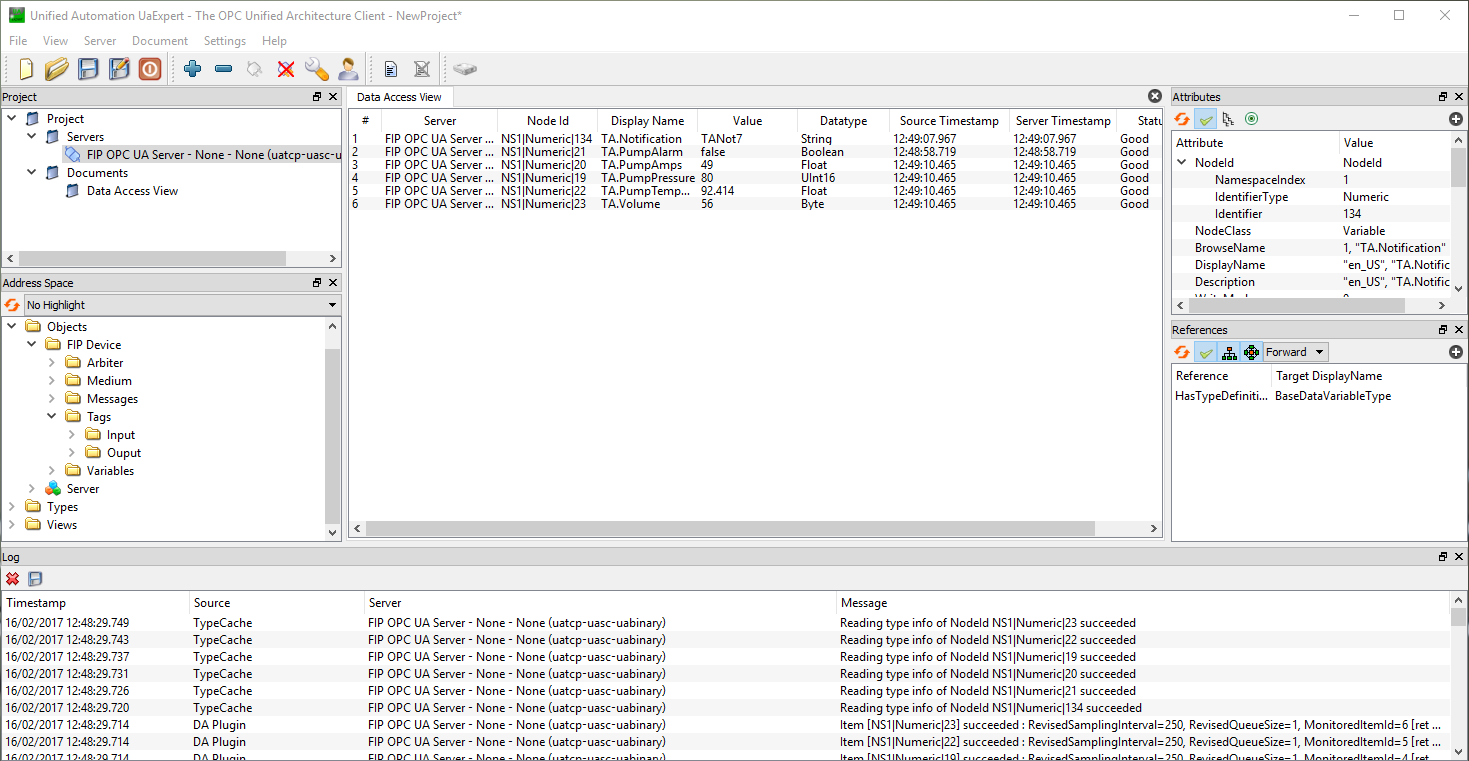
Once the sample is started, you can connect an OPC UA client to the following address: opc.tcp://localhost:16664
UAExpert Example - OPC UA client
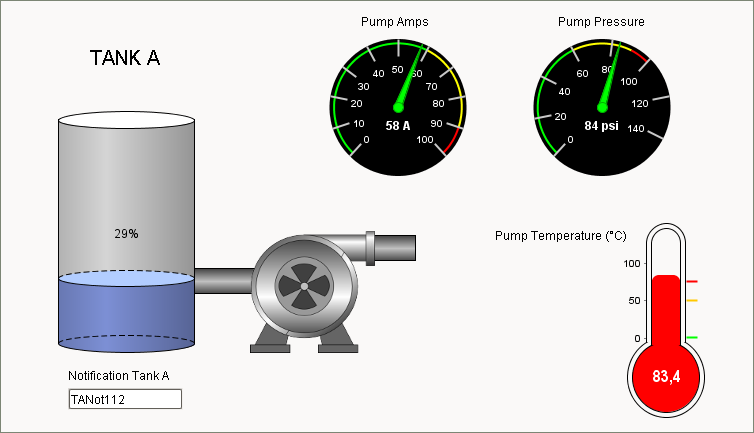
Ignition SCADA Example - OPC UA client
OPC UA - Blocking Mode
The FipCore library has embedded functions to start an OPC Unified Architecture (OPC UA) server inside your program.
For more information about OPC UA, see link: OPC Foundation.
In this example, we use the OPC UA server in blocking mode. It requires only 1 function :
fipcore_opcua_run
In this mode, it is not possible to switch locally on the FIP network using the FipCore functions. All manipulations will be done from the OPC client.
The execution of the program remains blocked in this function until the opc_is_running boolean is set to false.
bool opc_is_running = true;

static void stopHandler(int sign) {
    opc_is_running = false;
}

// Station0 - Tank A
void station0_process(uint8_t device_type, uint8_t device_index, char* xml_path)
{
    signal(SIGINT, stopHandler); /* catches ctrl-c */

    uint32_t ret = SUCCESS;
    fipcore_device_handle* sta0_hnd = NULL;

    sta0_hnd = fipcore_device_open(device_type, device_index, &ret);
    if (ret != SUCCESS) {
        printf("STATION 0 - %s\n", fipcore_get_error_str(ret));
        goto _exit1;
    }

    ret = fipcore_init_network(sta0_hnd, XML, xml_path, NULL);
    if (ret != SUCCESS)
        goto _exit;

    ret = fipcore_start_network(sta0_hnd);
    if (ret != SUCCESS)
        goto _exit;

    ret = fipcore_start_ba(sta0_hnd, 1);
    if (ret != SUCCESS)
        goto _exit;

    // Initialize your FIP output variables here
    // (...)

    printf("-> fipcore_opcua_run - [Press ctrl-c to quit]\n");

    /////////////////////////////////////////////////////////////////////////////////////
    // fipcore_opcua_run
    // OPC UA START SERVER - BLOCKING MODE - TCP port: 16664
    /////////////////////////////////////////////////////////////////////////////////////
    ret = fipcore_opcua_run(sta0_hnd, 16664, &opc_is_running, NULL);
    if (ret != SUCCESS)
        goto _exit;

    ret = fipcore_stop_ba(sta0_hnd);

_exit:
    if (ret != SUCCESS)
        printf("STATION 0 - %s\n", fipcore_get_error_str(ret));

    ret = fipcore_stop_network(sta0_hnd);
    if (ret != SUCCESS)
        printf("STATION 0 - %s\n", fipcore_get_error_str(ret));
_exit1:
    ret = fipcore_device_close(sta0_hnd);
    if (ret != SUCCESS)
        printf("STATION 0 - %s\n", fipcore_get_error_str(ret));
}
See the full file here: main.c
The complete source code is contained in the directory:
To test this example, open a terminal and enter the following commands:
Note: In the example, we attach a PCI/PCIe (1) FipArbiter device (Index 1) with the FIP Station (Addr 0) XML configuration file for a 2.5Mbps FIP network.
Windows console - OPC UA blocking example
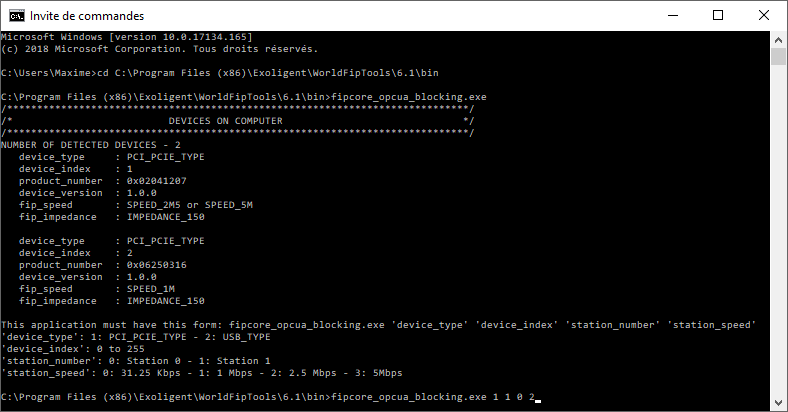
Once the sample is started, you can connect an OPC UA client to the following address: opc.tcp://localhost:16664
OPC UA - Control Access & Security Policies
We will see here how to secure the OPC-UA server embedded into the FipCore library.
For more information about the different security layers of OPC-UA, please refer to this great documentation from CERN:
OPC-UA Security.
OPC-UA security is based on x509 certificates. The OPC-UA specification provides security at different levels:
- [Certificates] : Clients can only create sessions with trusted servers. Servers only accept sessions from trusted clients.
- [Security Policies] : Session traffic can be "Signed", "Signed and Encrypted" or "Neither".
- [Control Access] : Clients can pass a token to the server which identifies a user.
1 - Certificates - Creation and Use
Certificates establish a trusting relationship between client and server. We will see in this part how to create our own self-signed certificate.
It is not advisable to use this method for on-site deployment. This method is only used to illustrate the mechanism in this tutorial.
Here we are on GNU/Linux, and we use openssl to create our own certificate authority (CA).
The commands below create the following:
- CA's key: This public and private key pair will be contained into the Certificate Authority (CA).
- Certificate Authority (CA): This is a trusted entity which also has its own public and private keys and a certificate (signed by itself, or self-signed). By "trusted" it is meant that clients willingly and knowingly install the CA's certificate (CA's information and public key) in their software.
- Certificate Revocation List (CRL): This file contains the list of certificates revoked by a CA.
Shell language - CA certificate creation
# Create directory to store CA's files
mkdir ca
# Create CA key
openssl genpkey -algorithm RSA -pkeyopt rsa_keygen_bits:2048 -out ca/ca.key
# Create self-signed CA cert
openssl req -new -x509 -days 3600 -key ca/ca.key -subj "/C=FR/ST=Paris/O=Exoligent/CN=FipOpcUaServer@localhost" -out ca/ca.crt
# Convert cert to der format
openssl x509 -in ca/ca.crt -inform pem -out ca/ca.crt.der -outform der
# Create cert revocation list CRL file
# NOTE : might need to create in relative path
#        - File './demoCA/index.txt' (Empty)
#        - File './demoCA/crlnumber' with contents '1000'
openssl ca -crldays 3600 -keyfile ca/ca.key -cert ca/ca.crt -gencrl -out ca/ca.crl
# Convert CRL to der format
openssl crl -in ca/ca.crl -inform pem -out ca/ca.crl.der -outform der
The CA and CRL files have been converted to DER format. This is the most common format for the OPC-UA applications.
- ca.crt.der
- ca.crl.der
These two files will be necessary for the OPC-UA clients that will connect to the server integrated into the FipCore library.
In this example we use the UA Expert client. To install the CA's certificate and CRL for this client:
- Open UA Expert.
- In the user interface go to
Settings -> Manage Certificates.... - Click on the
Open Certificate Locationbutton. This action opens the location where to copy the files. - Copy
ca.crt.derfile to$SOME_PATH/unifiedautomation/uaexpert/PKI/trusted/certs/folder. - Copy
ca.crl.derfile to$SOME_PATH/unifiedautomation/uaexpert/PKI/trusted/crl/folder.
The OPC client is now ready to accept connections signed by this new CA certificate.
We will now create the OPCUA server certificate which will be used by FipCore library.
The steps of creation are:
- Create the server public and private key pair.
- Create an
exts.txtwhich contain the Certificate Extensions required by the OPC UA standard. - Create its own unsigned certificate, and with it a Certificate Sign Request.
- Give the Certificate Sign Request to the CA to sign it.
Shell language - Own unsigned certificate creation
# Create directory to store server's files
mkdir server
# Create server key
openssl genpkey -algorithm RSA -pkeyopt rsa_keygen_bits:2048 -out server/server.key
# Convert server key to der format
openssl rsa -in server/server.key -inform pem -out server/server.key.der -outform der
# Create server cert sign request
openssl req -new -sha256 \
-key server/server.key \
-subj "/C=FR/ST=Paris/O=Exoligent/CN=FipOpcUaServer@localhost" \
-out server/server.csrg
We create the exts.txt file which contains the required Certificate Extensions used by CA to be able to sign.
[v3_ca]
subjectAltName=DNS:localhost,IP:127.0.0.1,URI:urn:fipopcua.server.application
basicConstraints=CA:TRUE
subjectKeyIdentifier=hash
authorityKeyIdentifier=keyid,issuer
keyUsage=digitalSignature,keyEncipherment
extendedKeyUsage=serverAuth,clientAuth,codeSigning
We can now sign the server's Certificate Sign Request using the CA and the Certificate Extensions file.
Shell language - Own certificate signing
# Sign cert sign request (NOTE: must provide exts.txt)
openssl x509 -days 3600 -req \
-in server/server.csr \
-extensions v3_ca \
-extfile server/exts.txt \
-CAcreateserial -CA ca/ca.crt -CAkey ca/ca.key \
-out server/server.crt
# Convert cert to der format
openssl x509 -in server/server.crt -inform pem -out server/server.crt.der -outform der
Output files:
- server.key.der
- server.crt.der
We can now pass these fields to the FipCore library. To do this, fill in the private_key_der and server_certificate_der fields of the OPCUA_USERCONF structure with the paths to the respective files server.key.der and server.crt.der.
In addition, the UA Expert client must be registered by the server in order to be considered as trust. To do this, the "trust_list_folder" field must point to a folder containing the client's certificate:
- Here we copy
$SOME_PATH/unifiedautomation/uaexpert/PKI/own/certs/uaexpert.derfile to our app folder:certificates/server/trust/.
C language - Configuring OPC-UA server certificates
OPCUA_USERCONF opcua_conf = {0};
// [...]
// OPC UA CONFIGURATION
// [...]
opcua_conf.server_certificate_der = "../certificates/server/server.crt.der";
opcua_conf.enable_encryption = true;
opcua_conf.private_key_der = "../certificates/server/server.key.der";
opcua_conf.trust_list_folder = "../certificates/server/trust/";
opcua_conf.issuer_list_folder = "../certificates/server/issuer/";
opcua_conf.revocation_list_folder = "../certificates/server/revocation/";

// OPC UA START SERVER
ret = fipcore_opcua_run(sta0_hnd, 16664, &opc_is_running, &opcua_conf);
if (ret != SUCCESS)
    goto _exit;
At this stage, our server is now recognized as trustworthy by our OPC-UA client and vice-versa.
We are now going to see the setting of the Security Policies.
2 - Security Policies - Encryption
OPC UA defines Security Policies and a unique URI for each policy:
- Basic256Sha256:
http://opcfoundation.org/UA/SecurityPolicy#Basic256Sha256 - Basic256:
http://opcfoundation.org/UA/SecurityPolicy#Basic256 - Basic128Rsa15:
http://opcfoundation.org/UA/SecurityPolicy#Basic128Rsa15 - None:
http://opcfoundation.org/UA/SecurityPolicy#None
Three Message Security Modes are supported:
- None:
No security is applied. - Sign:
All messages are signed but not encrypted. - Sign&Encrypt:
All messages are signed and encrypted.
These fields are configurable via the OPCUA_USERCONF structure of the FipCore library.
C language - Configuring OPC-UA server security policies
OPCUA_USERCONF opcua_conf = {0};
// [...]
// OPC UA CONFIGURATION
// [...]
/* enable encryption security policies */
opcua_conf.enable_encryption = true;
/* disable unencrypted channel */
opcua_conf.disable_unencrypted = true;
/* disable basic128Rsa15 secure channel */
opcua_conf.disable_basic128 = true;
/* enable basic256 secure channel */
opcua_conf.disable_basic256 = false;
/* enable basic256Sha256 secure channel */
opcua_conf.disable_basic256Sha256 = false;

// OPC UA START SERVER
ret = fipcore_opcua_run(sta0_hnd, 16664, &opc_is_running, &opcua_conf);
if (ret != SUCCESS)
    goto _exit;
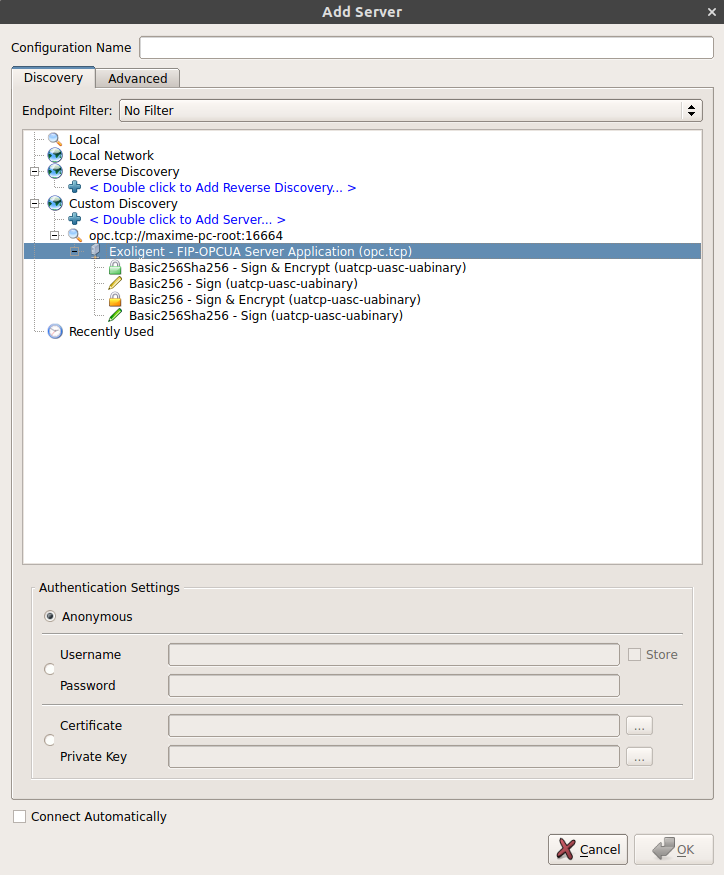
Once the server started, you can connect UA Expert client to the following address: opc.tcp://localhost:16664. The new security policies are now visible.
3 - Control Access - Login (Username/Password)
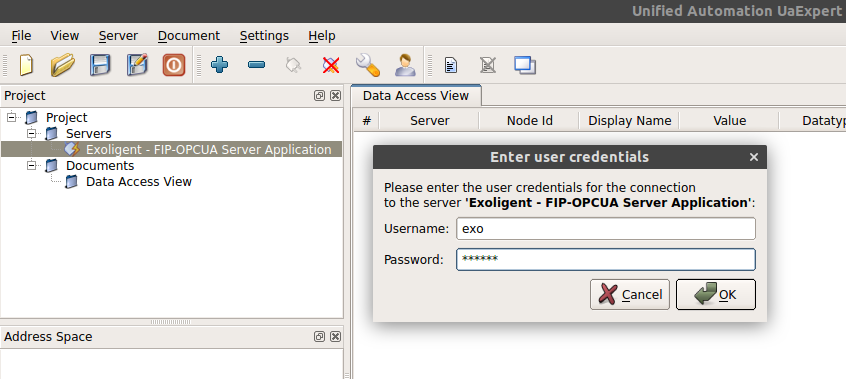
It is also possible to protect connections to the OPC-UA server with a Username Identity Token. The user must then identify himself with an username and a password registered in the server.
To do this, first you have to disable the Anonymous Identity Token connection via the disable_anonymous field of the OPCUA_USERCONF structure. Then you have to register the username/password pairs via OPCUA_LOGIN structures.
C language - Configuring Username Identity Tokens
OPCUA_USERCONF opcua_conf = {0};
OPCUA_LOGIN opcua_login = {.username = "exo", .password = "exopwd"};
// [...]
// OPC UA CONFIGURATION
// [...]
/* disable anonymous identity token */
opcua_conf.disable_anonymous = true;
/* create one username identity token */
opcua_conf.nb_logins = 1;
opcua_conf.logins = &opcua_login;

// OPC UA START SERVER
ret = fipcore_opcua_run(sta0_hnd, 16664, &opc_is_running, &opcua_conf);
if (ret != SUCCESS)
    goto _exit;
It is now no longer possible to connect anonymously to the server. The user has to enter its credentials.
See the full file here: main.c
The complete source code is contained in the directory:
To test this example, open a terminal and enter the following commands:
Note: In the example, we attach a PCI/PCIe (1) FipArbiter device (Index 1) with the FIP Station (Addr 0) XML configuration file for a 2.5Mbps FIP network.
Tutorial References:
- [1] OPC UA - Security (Cern)
- [2] How To Create Certificates? (Juan Gonzalez Burgos)
- [3] How Validation Work? (Juan Gonzalez Burgos)
Network Event - IRQ/Callbacks
The previous examples use a polling method to get the FIP network events. Another way available for PCI/PCIe devices type is the use of the hardware interrupt (IRQ) of the board to be alerted via a user callback function.
WARNING : USB FIP Arbitrator device does not support this method.
The example below describes this method :
void station0_process(uint8_t device_type, uint8_t device_index, char* xml_path)
{
    uint32_t ret = SUCCESS;

    FIP_STATISTICS stats = {0};
    FIP_NETWORK_STATUS medium = {0};
    FIP_USERCALLBACKS user_callbacks = {0};
    fipcore_device_handle* sta0_hnd = NULL;
    uint8_t station_number = 0;

    unsigned long tstart_200ms, tcurrent;

    sta0_hnd = fipcore_device_open(device_type, device_index, &ret);
    if (ret != SUCCESS) {
        printf("STATION 0 - %s\n", fipcore_get_error_str(ret));
        goto _exit1;
    }

    /////////////////////////////////////////////////////////////////////////////////////
    // fipcore_init_network
    // Callback registration to synchronize our job with FIP network events
    /////////////////////////////////////////////////////////////////////////////////////
    user_callbacks.fip_event = &event_processing;
    user_callbacks.fip_synchro = &synchro_processing;
    user_callbacks.ctx_ptr = (void*) &station_number;
    ret = fipcore_init_network(sta0_hnd, XML, xml_path, &user_callbacks);
    if (ret != SUCCESS)
        goto _exit;

    ret = fipcore_start_network(sta0_hnd);
    if (ret != SUCCESS)
        goto _exit;

    ret = fipcore_start_ba(sta0_hnd, 1);
    if (ret != SUCCESS)
        goto _exit;

    // Initialize your FIP output variables here
    // (...)

    tstart_200ms = GetTickCount();

    for (;;) {
        // Get current tick
        tcurrent = GetTickCount();

        // Make other job here
        // For example here, we get FIP statistics structure and print it every 200ms
        // (...)
        if ((tcurrent - tstart_200ms) > 200) {    // Each 200ms

            tstart_200ms = GetTickCount();

            // Get Fip Statistics & print
            fipcore_get_stats(sta0_hnd, &stats);
            print_stats(&stats);

            // Get Medium  & print
            fipcore_get_medium(sta0_hnd, &medium);
            print_medium(&medium);
        }

        if (kbhit())
            break;

#if defined(_WIN32) || defined(_WIN64)
        Sleep(2);
#else
        usleep(2000);
#endif
    }

    ret = fipcore_stop_ba(sta0_hnd);

_exit:
    if (ret != SUCCESS)
        printf("STATION 0 - %s\n", fipcore_get_error_str(ret));

    ret = fipcore_stop_network(sta0_hnd);
    if (ret != SUCCESS)
        printf("STATION 0 - %s\n", fipcore_get_error_str(ret));
_exit1:
    ret = fipcore_device_close(sta0_hnd);
    if (ret != SUCCESS)
        printf("STATION 0 - %s\n", fipcore_get_error_str(ret));
}

/////////////////////////////////////////////////////////////////////////////////////
// fip_event callback
// This function is executed each time an event from the FIP network is raised by
// the board
/////////////////////////////////////////////////////////////////////////////////////
void event_processing(fipcore_device_handle* hnd, void* ctx)
{
    uint32_t ret = SUCCESS;
    uint16_t event_code = 0;
    uint16_t id = 0;
    uint8_t direction = 0;

    ret = fipcore_read_evt(hnd, &event_code, &event_parameter);

    while (ret == SUCCESS) { // All events are popped

        bool msgReceivedToTreat = false;

        /* treat event code here */
        switch (event_code) {
        case FIP_EVT_SEND_VAR_P:    break;
        case FIP_EVT_SEND_VAR_T:    break;
        case FIP_EVT_RECEIVE_VAR_P: break;
        case FIP_EVT_RECEIVE_VAR_T: break;
        case FIP_EVT_RECEIVE_MSG:   msgReceivedToTreat = true; break;
        case FIP_EVT_SEND_MSG:      break;
        case FIP_EVT_SEND_APU:      break;
        case FIP_EVT_SEND_APN:      break;
        case FIP_EVT_BA_ACTIVITY:   break;
        case FIP_EVT_BA_STOP1:      break;
        case FIP_EVT_BA_STOP2:      break;
        case FIP_EVT_BA_STOP3:      break;
        case FIP_EVT_BA_IDLE:       break;
        default:
        break;
        }

        if (msgReceivedToTreat) {
            uint32_t ret1 = SUCCESS;
            uint16_t i = 0;
            MESSAGE_FRAME_IN c_msg = {0};

            ret = fipcore_read_msg(hnd, &c_msg);
            if (ret == SUCCESS) {

                uint8_t srcSeg  = c_msg.Src_Segment;
                uint8_t destSeg = c_msg.Dest_Segment;
                uint16_t srcId  = (((uint16_t) c_msg.Src_Add_PF) << 8)  + c_msg.Src_Add_Pf;
                uint16_t destId = (((uint16_t) c_msg.Dest_Add_PF) << 8) + c_msg.Dest_Add_Pf;

                // printf("MSG: ");
                // for (i = 0; i < c_msg.Msg_Length; i++)
                //     printf("%c", c_msg.Useful_Data[i]);
                // printf("\n");
            } else
                printf("ERROR - %s\n", fipcore_get_error_str(ret));
        }

        ret = fipcore_read_evt(hnd, &event_code, &event_parameter);
    }
}

/////////////////////////////////////////////////////////////////////////////////////
// fip_synchro callback
// This function is executed each time the synchronization variable (0x9003) is
// read and is raised by the board
/////////////////////////////////////////////////////////////////////////////////////
void synchro_processing(fipcore_device_handle* hnd, void* ctx)
{
    uint8_t station_number = *((uint8_t*) ctx);
    PRODUCED_VARIABLE p_var = {0};
    CONSUMED_VARIABLE c_var = {0};
    bool is_prompt = false;
    bool is_refreshed = false;

    // Make other job here
    // For example here, we update the periodic variable according to the calling station
    // (...)
    if (station_number == 0) {

        // ID (0x8426) value is incremented (4 first bytes / 12 total)
        memset(&p_var, 0, sizeof(PRODUCED_VARIABLE));
        *((uint32_t*) (p_var.Data_Var)) = inc_data;

        fipcore_write_var_by_id(hnd, 0x8426, &p_var);

        memset(&c_var, 0, sizeof(CONSUMED_VARIABLE));
        fipcore_read_var_by_id(hnd, 0x8427, &c_var, &is_prompt, &is_refreshed);

        // ID (0x8322) value is incremented (4 first bytes / 12 total)
        // Note: ID (0x8322) is written each 1s. However, production on the network will be effective
        // only each 10s (see fipcore_send_aper_by_id routine below).
        // This is due to the fact that ID (0x8322) is not present in the scan tables of the arbiter.
        // So it's an apriodic variable.

        memset(&p_var, 0, sizeof(PRODUCED_VARIABLE));
        *((uint32_t*) (p_var.Data_Var)) = inc_data;

        fipcore_write_var_by_id(hnd, 0x8322, &p_var);

        inc_data++;

    } else if (station_number == 1) {

        memset(&c_var, 0, sizeof(CONSUMED_VARIABLE));
        fipcore_read_var_by_id(hnd, 0x8426, &c_var, &is_prompt, &is_refreshed);

        // ID (0x8427) value is decremented (4 first bytes / 12 total)
        memset(&p_var, 0, sizeof(PRODUCED_VARIABLE));
        *((uint32_t*) (p_var.Data_Var)) = dec_data;

        fipcore_write_var_by_id(hnd, 0x8427, &p_var);

        memset(&c_var, 0, sizeof(CONSUMED_VARIABLE));
        fipcore_read_var_by_id(hnd, 0x8322, &c_var, &is_prompt, &is_refreshed);

        dec_data--;
    }
}
See the full file here: main.c
The complete source code is contained in the directory:
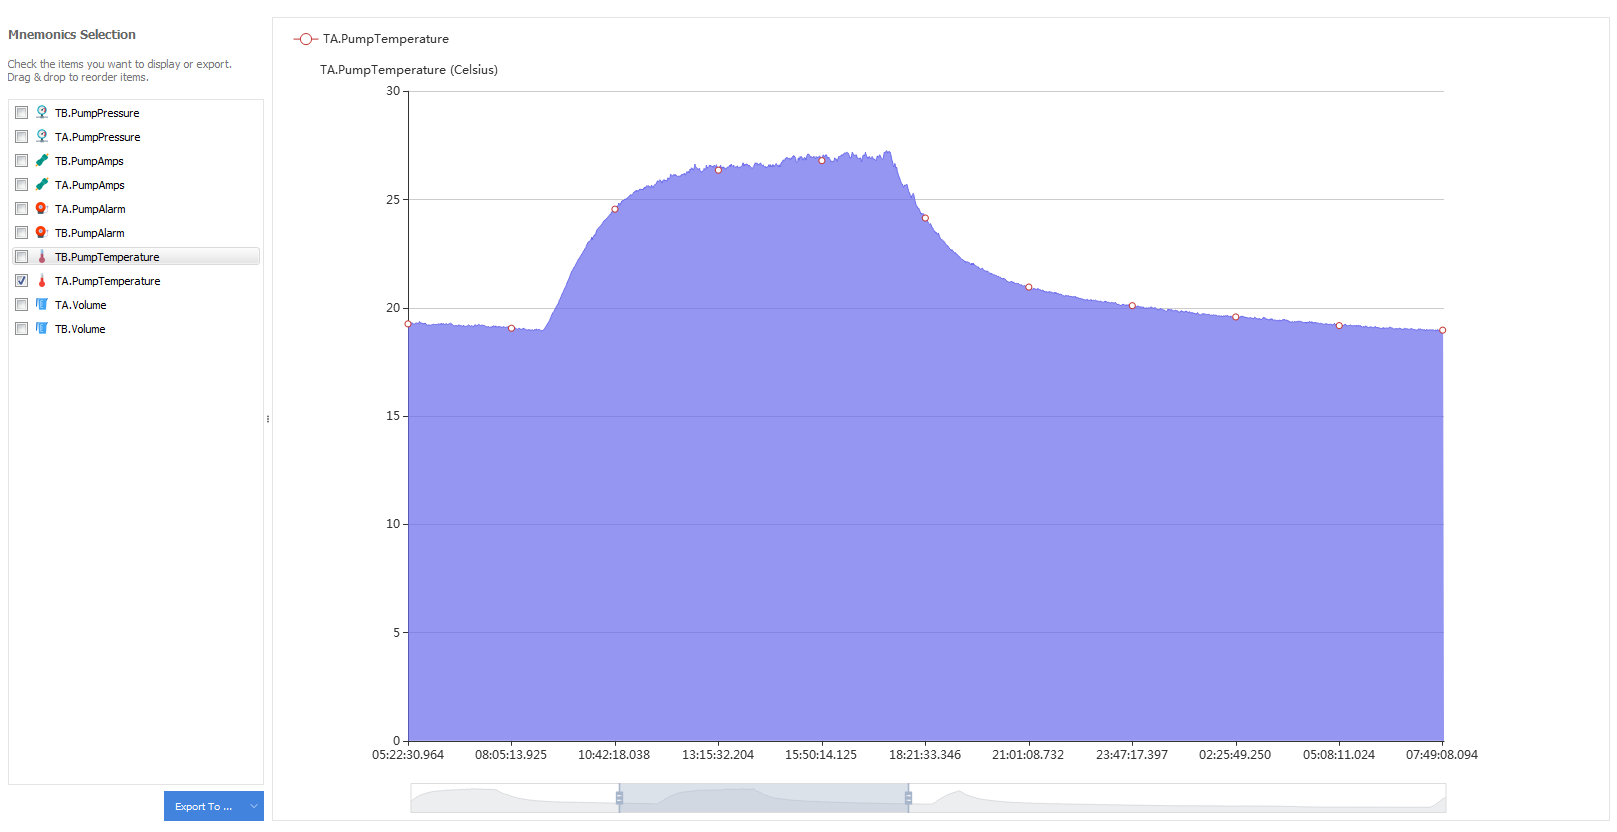
To test this example, open a terminal and enter the following commands:
Note: In the example, we attach a PCI/PCIe (1) FipArbiter device (Index 1) with the FIP Station (Addr 0) XML configuration file for a 2.5Mbps FIP network.
Windows console - Network Events (Callbacks)
